The first step was to plot out where the fence would go, as that would dictate the amount I needed to build. I plopped my three completed buildings in place and then used toothpicks and string to draw lines around them. My friend is a professional surveyor and to hear him talk you would think it is a tough job, but this was easy. The challenge is that the siding for the tank car is short, and to lengthen it more would severely cut into the space where the lumberyard office is. My metal yardstick helped measure the wall lengths.
It was then time to build. Unfortunately, my supply of stripwood had just been decimated by the lumber shed project so I had to go to Hobby Lobby and look for suitable basswood. They had four packages of 1/16" x 1/4" stock, which in O scale is 3" thick by 12" wide. I bunched them together and used a square and scale ruler to mark out scale 8' long lengths. You can also see the molded Atlas fence in the picture.
My bandsaw and sixty seconds resulted in this:
They were roughly divided into three piles and dumped into bags containing three different ink and alcohol washes to weather them.
After about an hour I set the boards aside to dry.
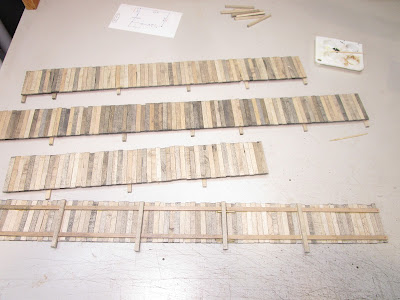
I taped my yardstick to my workbench, and with a metal block on one end I started arranging boards. If they had a "good side" I generally put it facedown, as that would be the outer side once installed. I didn't force the boards together as a little airgap between them would prevent any expansion/contraction problems in the future. I also cracked and weathered a few boards for effect, but nothing serious as a lumberyard would quickly replace broken boards.
To make good contact while the glue dried I used more weights. I also gently squared up the tops while the weights were on, though I could only do it in small batches because the boards were lightweight and wanted to buckle up.
The walls are framed with 1/8" x 3/16" wood, which is probably a bit overscale but I wanted my fences strong enough to survive an occasional bump. I didn't measure their location but simply put one on the top and another on the bottom. To secure their joints, I used wood toothpicks glued under the boards (to hopefully make them harder to see).
I propped the wall sections in place temporarily and was pretty happy with them, so I pressed on.
Using a 0.7mm mechanical pencil and a straightedge, I embossed four nail holes in every board (I didn't bother doing the back fence). This amounted to 809 total nail holes. A friend showed me this technique and it works well, but it is tedious.
Next, I took more of the 1/8" x 3/16" wood and added taller fenceposts about every 15 scale feel along the inside of the wall. They were roughly flush with the top but extended about 1/2" below to get buried in the ground later on.
Finally, the walls were ready to be assembled at the corners. I had to line things up and use weights to hold them in position while the glue dried. There wasn't a lot of surface area for the joints so I had to be careful.
The attaching the fourth wall resulted in some of the earlier wall sections hanging in the air. Though they seemed to hold up fine, I thought it wise to support it with the only adjustable brace I could think of... a tape measure!
The last thing to do was set it on the layout and mark the locations where I need to drill holes for the fence posts. I may not do that after all... I might just cut them flush at the bottom and glue the fence down directly to the layout. But it's good to have options.
I still have to build the gates for both the road crossing and the railroad track entrances, but they will probably done in situ as I add the scenery.


No comments:
Post a Comment