

The office included in the kit looked more like a shop from a wild west town because of the false front. I suspect Walthers (and then Atlas) decided not to create the patterns and molds for a new building and instead repurposed some old tooling they had on hand. I couldn't live with it as is.


Before I glued the floor down I cut some new interior walls from 0.040" styrene. I had to angle the tops to match the roof profile, and cut out notches for any interference areas. I didn't bother with a front wall because it can't be seen while looking through the front windows.


I first toyed with modifying a Lionel kit (#6-12273), another product from the 1970s MPC era that is still available today. I would ditch the platform and mount the structure on the ground, and perhaps cut back the front porch overhang. Easy enough. I even found an assembled kit for $10 at a train show but it was glued together and that would have made my project difficult. Unassembled kits are now selling online for about $40 delivered... way too much for what it is.

Since the Atlas office just snaps together for easily assembly/disassembly I put it together just to see how bad it was. I looked at it from all angles and thought about cutting down the sides so that they were flat (the same height from front to back). But first I had remove the top of the front wall, because if that didn't fix it for me there was no point going forward.

To match the horizontal trim along the top I added a strip of styrene. In less than two minutes, I liked it better and decided to press on. All four walls were then permanently assembled. The two large picture windows in the front aren't really something you would find in a lumberyard office, but I will live with them.

If I wanted to install an interior I would need to add a floor. Interestingly, Atlas includes a base with a socket for a lightbulb which they provided. But that light would reveal an empty interior! So, I glued the four walls to the base and then cut away the middle portion where the light bulb socket was.

Next, I added 1/4" square styrene all around the bottoms of the walls. This reinforced the joints and raised the floor level which is important because the entry doors are several scale feet above the ground. Then I temporarily snapped on the roof and used a pencil to draw a line underneath on the insides of all four walls. That way, when I built new interior walls I wouldn't make them so tall as to interfere with the roof's fit.

The subfloor is a piece of 0.060" thick styrene that I roughly sized to drop it. Its corners were notched to get around those interlocking lugs. It isn't a perfect fit but it doesn't have to be. I will install four interior walls and then cut the final visible floor to drop between them.

The next step is unusual but one that is tough to address later on. Due to the nature of the kit, I wasn't sure exactly how tight the wall corner joints would be. If I was going to take the time to light it up, I didn't want the light to leak out of the joints. So I masked the upper portions of the walls that would be visible once the building was completed (entirely unnecessary, by the way) and then used black paint to coat the entire inside of the structure. Since I was going to later repaint the outside I wasn't concerned about any overspray.

I thought a better exterior paint scheme would go a long way towards making the office look good. I didn't want to use the same Rustoleum "Strawflower" yellow that was on the two other buildings. I also didn't want white, as I knew some of my other industries would be white. So what did that leave me? Maybe brown?
I painted the exterior walls a reddish-brown, but I didn't like that, so I repainted it more of a beige color (Rustoleum satin "Nutmeg", which I used on the larger storage bin's shelving units. The windows and doors were painted Rustoleum "Strawflower" yellow to match the other two buildings, giving them a unified look.
For the finished floor I was going to paint the styrene to look like linoleum but by chance I had a piece of scribed wood with 6" scale width boards which was the exact size I needed! And for a lumberyard, it was more appropriate anyway.

I used a knife and scribed end board joints along the way, mostly following a pattern. Then, everything was stained with my brown/black ink and alcohol wash. This caused the wood to warp a bit.

Before I glued the floor down I cut some new interior walls from 0.040" styrene. I had to angle the tops to match the roof profile, and cut out notches for any interference areas. I didn't bother with a front wall because it can't be seen while looking through the front windows.

Then, I used lots of superglue gel and weights to attach the wood floor. Hopefully it will stay flat forever.

The new inner back wall was a bit more tricky as I had to install it around the window castings. Before I glued it in place, I painted around the windows because my any gaps would show brown instead of white.

Then the new wall was installed.

I used styrene strips to build up new "frames" around the windows and the door to hide the gaps. I think they look better now.

There are lots of great O scale 3D printed interior details, such as this complete office detail set, but I enjoy making stuff myself. I started with some bookshelves and a large filing cabinet (for company records) built from bits of styrene. I was cognizant of the fact that this will be viewed from several feet away and didn't go overboard.

Once painted and then loaded up with various bits and pieces of styrene, they looked pretty good.

My layout is set in Autumn so I thought a nice festive welcome mat would be a nice touch. Some black construction paper, a little craft paint, and several toothpicks and I had one. Unfortunately, from normal viewing angles it is impossible to see. Oh well.

Though much of my detailing won't be seen, I do it because I enjoy it. It is one of the reasons I switched from HO scale to O scale. But my work isn't being done to win awards. (PS: if you want to see some of my scratchbuilt models that did win NMRA Merit awards, look here).

The lumberyard is being named for my friend and O scale coconspirator, Peter Hansen. In real life, if he owned a business he would definitely have a train in his office. I spent an hour or so looking online at doll house trains, and even T-gauge 1:450 scale trains, before settling on a toy I got in a gift shop years ago. I filed down some details I didn't like, gave it a new paint scheme, and mounted it on top of the large filing cabinet.
I then realized that the office had no bathroom or utility room, which wouldn't do. So I took some styrene and formed an L-shaped wall that effectively turned one of the back corners into a "whatever you think is missing, it's in that room" area. The large white tabs on the bottom are to give more surface area to secure the walls to the floor.

Wires for the interior lighting were then run up into the utility room, thus justifying its existence.

After pondering how I was going to install the interior lights, I added a false roof which is secured on the sides by strips of styrene glued to the walls. Two holes were drilled in it, and then a pair of SMD 12-volt LEDs were taped down with loops in the wires for strain relief.

For some more interior details, the desk was scratch built though the chair is a 3D resin casting from Pacific Northwest Miniatures that I found on Ebay. I hate bad looking figures and think they are worse than no figures at all, Woodland Scenics makes nicely painted ones. The sitting figure is part of set #A2759, though his feet had to be trimmed because the chair was too short. The standing guy in the front is from set #2741. I also found images of clocks and calendars online and scaled them to size, printed them out, and glued them to the walls.
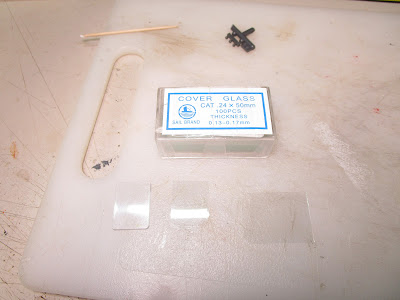
Most of the window glazing is the overly-thick clear acrylic provided in the kit, secured with tacky glue. However, for the rear side door I substituted thin microscope slide cover glass because it is possible to look through the front windows and see how thick the glazing was on the door.

For the roof, I ditched the brick chimney which I felt was inappropriate for this building. I painted the underside white to match the interior wall color. Then, I applied strips of blue painter's tape to the upper surface look like tar paper.

It was sprayed black and then weathered with various drybrushed acrylic paints. A small exhaust pipe was installed it over the utility room area. The roof slants away from the aisle and I am not sure if it will be visible, but I wanted it to look good anyway.

I weathered the outside of the building with an oil paint wash of mostly dark brown and black. It wasn't heavy but it did settle into the various nooks and crannies. This building is well maintained as a matter of pride so I didn't go crazy.

The sign on the front of the building was a decal custom made for me by Bill at Precision Design Company, who has helped me in the past with other projects. I didn't want the lettering to look "too new", or "too old", so we settled on a font and style that would probably be appropriate from the 1960s to the 1980s. I applied it to a piece of styrene that I painted brown and then attached to the front.
Unfortunately, there is a slight wavy line in the bottom that I was caused during the application process and I couldn't get it out, and when I tried a second decal it was worse. The lines are just too thin and long and I am not a great decal person. It is very pronounced in the close-up shot but from two feet away you don't even notice it.

With that, this structure was complete. I still have one more thing to build and then the lumberyard scene can start to come together.
No comments:
Post a Comment