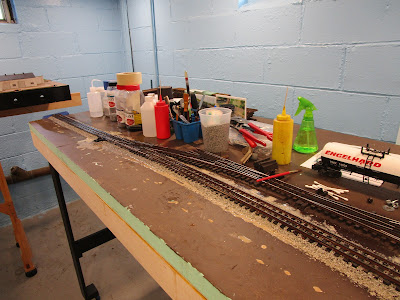
The process started by first building up the roadbed under the track to set the profile of the ballast. I used O scale cork roadbed with tapered shoulders on the mainline and passing siding, and a combination of N scale roadbed (on one siding) and half-strips of O scale roadbed so the ends of the ties would stick out (on another siding) to vary the look and overall height. In another area, I buried the track down to the tops of the ties. All of these things are subtle but add to the illusion that the railroad was built in different times, to different physical standards, and maintenance (or neglect) have affected the results.

After weathering the track, it was time for ballast. I have used Woodland Scenics ballast products in the past and liked them, and don't mind that they are made out of crushed walnut shells. For my HO layout I made a sample test board where I tried about a dozen different sizes, colors, and manufacturers of ballast. Here, I first used real sifted rock obtained from a construction company conveniently down the road but found it to be too large. It would have taken me forever to sift enough for my layout.
So, I turned to Dennis Brennan and his ballast products. I purchased samples of his ballast and sand, and was impressed. They aren't cheap, but they aren't expensive either. For me, my layout is mostly going to sit there and be looked at. So, money spent on scenery instead of the next fancy expensive engine is a better decision for me. (Some people use kitty litter or chicken grit, and the internet is full of threads about this. I stayed away from it). However, something was bugging me about his ballast and I waited for months to apply it.
When I decided to bite the bullet and get going, I first tested all my electrical connections again to make sure all the track was powered. Then, I separated my layout sections and applied some tape to the ends to keep it from spilling onto the foor. That sort of worked.
One technique I wanted to try was from Dennis' book, and that is adding brown paint to the glue mixture to tint the final color of the ballast. His recipe is 1/3 white glue, 1/3 water, and 1/3 earth colored latex paint. I had never heard of this before and thought it would be a good idea.
To apply the wet water (50/50 water and rubbing alcohol) I used a cheap food dispenser bottle, making sure I got it everywhere. Then, I slowly went over everything with my glue mixture stored in another food bottle. That's when it got bad... REAL BAD. As soon as I applied the glue/water/paint mixture I knew something was wrong. It was too thick. And paint-ish. and it turned my carefully weathered ties into pools of latex paint on top.
I quickly used Q-tips and paper towels to clean the tops of the ties. Then I sprayed on more wet water directly to try and dilute it. I could have vacuumed up the wet mess with my shop vacuum but I was afraid that would make it worse.
I should have tested this process first. Because I didn't, this section of the mainline ended up more brown than what I really wanted. I later discovered the better ratio for me was to mix the water/glue/paint mixture to about 40% glue, 30% water, 20% paint, and 10% rubbing alcohol. That worked much better, and if I sprayed wet water onto the tops of the ties the latex paint just blew right off.
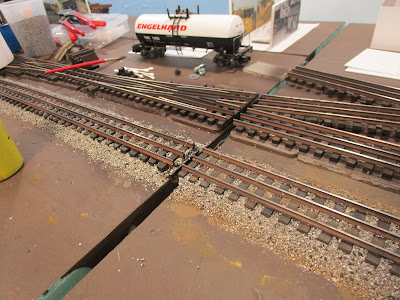
The next sections went fine, and there wasn't as much dirt/paint in the ballast. You can see the newer results on the left, and my first section on the right.
I never know if I have added enough glue while ballasting so I kept coming back and adding more to the areas just to make sure everything was fully saturated. Also, the holes where I ran my wires down really sucked up ballast and I spent a lot of time filling them in.
Finally, the next day I realized what was bothering me about the ballast: its color.
I am used to Woodland Scenics' grey blend ballast, which looks a lot like the real stuff I see in the Northeast. However, the stuff from Brennan's is a lot more "salt and pepper" with black flecks in it. It looks natural enough, but not exactly what I was thinking of. The pictures in his scenery book looked great so I used it. And, with the latex paint added it really helped tone down and even out the color of everything. However, for the rest of my layout I may switch back to Woodland Scenics gray ballast, and I might also omit the latex paint in the glue mixture. We'll see.

For now, though, I am content at the look of my track.


No comments:
Post a Comment