Friday, April 25, 2025

Lumberyard scene (Ground Goop and scenery)

It was time to scenic the lumberyard. For that, I turned to "Ground Goop", a concoction so named by Lou Sassi and written about on my blog here. It is a combination of scenery materials, paint, and glue which forms a ground cover and does a great job of representing undulating earth. One of the components is Celluclay which is also the foundation for Sculptamold, but I haven't experimented with that yet.

Lou's recipe for Ground Goop is:
- 1 part Celluclay
- 1 part Vermiculite
- 1 part brown latex paint
- 2/3 or 3/4 part Elmers glue ("Glue All", not "School Glue")
- shot of Lysol liquid concentrate (I don't add this, but I don't make enough to have extra).
* add water to desired consistency (like oatmeal)

I make it in small batches of about 1 cup per part, which results in 4 cups of ground goop. It is pretty thick until you thin it with water, but be careful because if you thin it too much it makes a mess. You don't want it splashing on your structures or track. Wearing cheap disposable gloves is also recommended.


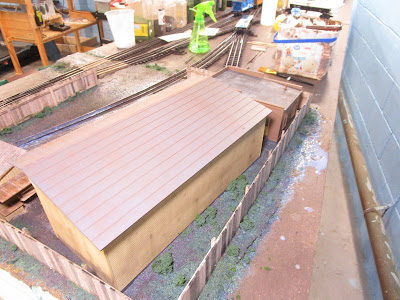
I put on disposable latex gloves and used an offset spatula (a cheap one I bought on Amazon for just this purpose) to spread it all over the base. I worked in small areas, focusing first around the edges where the fence would go and then around the railroad track. I avoided going directly near a structure's base, and I also didn't use it to fill between the rails. This stuff isn't difficult to wipe away if it goes in the wrong place, but I didn't want to risk splattering it on walls or the rails.


I smoothed it out as best I could. Spraying with rubbing alcohol helps a bit. However, my goal was to break up the perfectly flat surface left by the cork underlay as well as fill in any big gaps and holes around the scene. Some dips and bumps were fine, and in fact preferable, to a perfectly flat surface. For the road, I applied it much thicker along the edges and used it to build up angles where the ground rose to meet the road.

What I forget is that leaning over the edge of the road would get the goop on my T-shirt. Oh well, now I have a new "scenery shirt". 

Then, I went over everything and sprinkled a layer of my extra fine dirt. I collect and process real dirt, and I have been waiting for nice weather to build up my supplies. I better do it soon as this scene just about used up all that I had left.


I clipped the fence posts flush with the bottom of the fence and then buried the fence carefully in the goop. This would hold it in place once dry. Next, I went around the perimeter and applied grass, weeds, and bushes to the inside and outside of the fence. 


Normally I don't care about the areas behind buildings but here it is visible from the side of the layout so I didn't neglect it. I ran out of dirt and ground goop so I left the areas behind the fence mostly bare painted foam for now. In the future I will add some trees too.


I used up two grades of real dirt, six types of ground foam in various colors and sizes, and some of Brennan's "Superior Sand" which I liberally used on the road and lumberyard areas to look like gravel. All of this was sprayed further with rubbing alcohol and then secured with the remainder of my homemade matte medium. I discovered my matte medium was so old that part of it congealed, and I had little white gummy bits throughout my scenery that I had to later pick out with tweezers. Ugh. I threw out what was left after this project.


For between the rails of the siding, I just poured in dirt and then more sand. Ground foam weeds were scattered about, and the railheads were then cleaned. 


I still need to add some larger bushes or trees, railroad crossing signs, a vehicle or two, and a track bumper to stop wayward freight cars. I also need to build security gates for both the road and track entrances, and perhaps more fence. So, this scene will keep me busy for a little bit more in the future. But I am happy with how it is turning out.

Friday, April 18, 2025

Lumberyard scene (wooden road crossings)

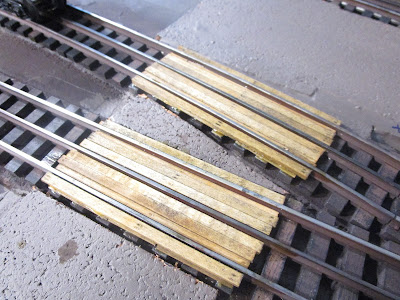
I wanted a grade crossing built with wooden planks leading into the lumberyard, which seemed appropriate for a dirt and gravel road. I started by gluing some thin stripwood to the tops of the ties to build up the height of the crossing so that it was just below the height of the rails.


Then, planks cut from some 1/8" x 3x16" basswood were glued on. I pressed them snuggly against the middle rail because no wheel flange rides along there. But, I had to leave a gap along the insides of the outer rails to account for oversize tinplate flanges.


The passing siding has a slight curve to it, and I used T-pins to hold the wood securely in a slight curve until the wood glue cured. I did each board one at a time so that I could put as much clamping pressure as possible on it.


Then, very thin wood was glued into the gaps on the insides of the running rails where the flanges go. They aren't high enough to match up with the other boards, but they hide the ballast and gaps between the ties. I tested with a boxcar to make sure there weren't any clearance issues.


A 0.5mm mechanical pencil was used to punch holes in the boards to represent nails. An awl would have worked just as well. This pencil is part of a set given to me by my model mentor who bought them for the exact same purpose. 


I had recently made some new batches of ink and alcohol stains so I first treated the wood with a reddish-brown wash. Then, I went over it several times with a weak black wash to add weathering.


They are now ready for the dirt and gravel road.

Friday, April 11, 2025

Lumberyard scene (cork foundation and road)

I wanted the lumberyard to be built on a dirt/gravel lot, with the track buried in it. I had previously lowered the level of the track down into the foam, but the height of the oversize tubular rails stuck up so much that I would have likely needed 3/16" of dirt/gravel/whatever to bury them (while still leaving a little bit sticking up for track cleaning). That meant I had to add another layer of something around the tracks to help take up that space.

While I was doing that, I realized I might as well do the same thing for the area where the entrance road would cross the tracks. I wanted as much elevation change as I could get on this layout, as New England is anything but flat. That meant I didn't want the road to hit the tracks and suddenly veer up at a steep angle to cross them. The road should be on raised foundation like the train tracks. 

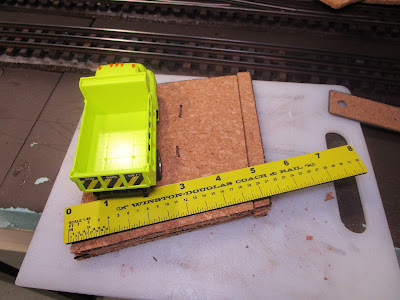
When I previously marked the location of the road I drew it 25 scale feet wide, which seemed reasonable for a rarely used driveway. But when I set a 1:48 scale truck on it, it looked too wide for the scene. Instead of two narrow lanes, I instead cut the cork down a bit so that it was one overly-wide lane. That way, it wouldn't dominate the scene.


Using some 3/16" cork tiles I had on hand, I cut out two layers for the road's base. They were then glued in place with tacky glue and heavily weighted so that they would dry flat. They will later be topped with dirt and gravel. I later realized the road was still too wide so I trimmed it narrower again. After I add the slopes on the sides I think it will be perfect.


I used more 3/16" thick cork tiles to build up where the lumberyard would be. I quickly switched from tacky glue to clear latex caulk, which sped things up and did a better job filling in any gaps. Everything was pinned down using T-pins that by now were showing their age. 


I attached a piece of cork to the inside of the foundation to bring it up to the level of the road, but realized I wouldn't have enough room to slope it down. So I removed it. I will need to use my actual dirt/gravel to make the transition but at least I would have to sand down the cork into a slope.


I ran out of cork tiles pretty quick. I planned to go to the craft store to buy some but I have been so busy that I didn't have time. What I did have was some used O gauge cork that a friend gave me. Funny... six months ago I was lamenting the lack of cork roadbed anywhere and now I had it in abundance! I used parts that didn't have any paint or plaster on them to fill in the rest of the area.  


I even pulled out my small roller to help squish the caulk town into a flat layer. 


When I ran out of pins I had to call it a day. But the next morning I finished it up.


Then, most of it was painted brown. It goes on light brown, but dries a nice dark color that matches my real dirt perfectly. Naturally, I ran out of paint so it will have to do.


Finally, the structures were glued down with latex caulk. Hopefully they will pop right off if I ever need to remove them. 


I think I will need a lot of dirt to scenic this area, so I hope the weather warms up soon so I can go collect some.

Friday, April 4, 2025

Lumberyard scene (wooden perimeter fence)

My lumberyard needed a security fence around it, and it seemed only natural to build one out of wood instead of chain link material. The Atlas kit actually came with some plastic sections of wooden fence, but there wasn't enough of it, it had gaps between the boards, and it didn't look like wood. I could do better.

The first step was to plot out where the fence would go, as that would dictate the amount I needed to build. I plopped my three completed buildings in place and then used toothpicks and string to draw lines around them. My friend is a professional surveyor and to hear him talk you would think it is a tough job, but this was easy. The challenge is that the siding for the tank car is short, and to lengthen it more would severely cut into the space where the lumberyard office is. My metal yardstick helped measure the wall lengths.  


It was then time to build. Unfortunately, my supply of stripwood had just been decimated by the lumber shed project so I had to go to Hobby Lobby and look for suitable basswood. They had four packages of 1/16" x 1/4" stock, which in O scale is 3" thick by 12" wide. I bunched them together and used a square and scale ruler to mark out scale 8' long lengths. You can also see the molded Atlas fence in the picture.


My bandsaw and sixty seconds resulted in this:


They were roughly divided into three piles and dumped into bags containing three different ink and alcohol washes to weather them. 


After about an hour I set the boards aside to dry. 


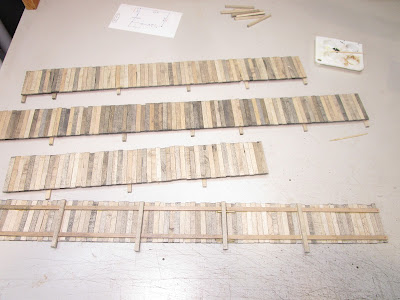
I taped my yardstick to my workbench, and with a metal block on one end I started arranging boards. If they had a "good side" I generally put it facedown, as that would be the outer side once installed. I didn't force the boards together as a little airgap between them would prevent any expansion/contraction problems in the future. I also cracked and weathered a few boards for effect, but nothing serious as a lumberyard would quickly replace broken boards.


To make good contact while the glue dried I used more weights. I also gently squared up the tops while the weights were on, though I could only do it in small batches because the boards were lightweight and wanted to buckle up. 


The walls are framed with 1/8" x 3/16" wood, which is probably a bit overscale but I wanted my fences strong enough to survive an occasional bump. I didn't measure their location but simply put one on the top and another on the bottom. To secure their joints, I used wood toothpicks glued under the boards (to hopefully make them harder to see). 


I propped the wall sections in place temporarily and was pretty happy with them, so I pressed on.


Using a 0.7mm mechanical pencil and a straightedge, I embossed four nail holes in every board (I didn't bother doing the back fence). This amounted to 809 total nail holes. A friend showed me this technique and it works well, but it is tedious.


Next, I took more of the 1/8" x 3/16" wood and added taller fenceposts about every 15 scale feel along the inside of the wall. They were roughly flush with the top but extended about 1/2" below to get buried in the ground later on.


Finally, the walls were ready to be assembled at the corners. I had to line things up and use weights to hold them in position while the glue dried. There wasn't a lot of surface area for the joints so I had to be careful.


The attaching the fourth wall resulted in some of the earlier wall sections hanging in the air. Though they seemed to hold up fine, I thought it wise to support it with the only adjustable brace I could think of... a tape measure!


The last thing to do was set it on the layout and mark the locations where I need to drill holes for the fence posts. I may not do that after all... I might just cut them flush at the bottom and glue the fence down directly to the layout. But it's good to have options.


I still have to build the gates for both the road crossing and the railroad track entrances, but they will probably done in situ as I add the scenery.