When I was younger I had built the ubiquitous Atlas HO scale lumberyard kit, and I knew that I wanted to use its big brother (Jack's Lumber Company, #6907) for this layout. With this decision made, I could use the foundation for the open lumber shed to help lay out where the track, access road, and other structures would go. It helped that the dimensions of the Atlas kit were available online so I made templates.


I didn't want my model to look exactly like everyone else's lumberyard. Then I remembered a Lionel lumber shed kit (#6-81629) I had picked up for $5 at a train show several years ago for just this purpose. It isn't very large and it might not be 1:48 scale, but a shed is a shed is a shed (am I right?).

The kit screams cheap Lionel plastic, but it did provide a nice structure at a reasonable price. And for a child it would serve as a good introduction to plastic kits. With a new paint job and disposal of those horrible plastic wood piles, it might just turn a Charlie Brown tree into a nice one. I glued it up and attached it to the base for rigidity. Normally I don't like structure bases but here I was going to hide it with ground cover.

Once assembled, it was given a few light coats of Rustoleum satin "Strawflower" spray paint to hide that awful avacado green. All the buildings in the lumberyard will share this color to unify them together.
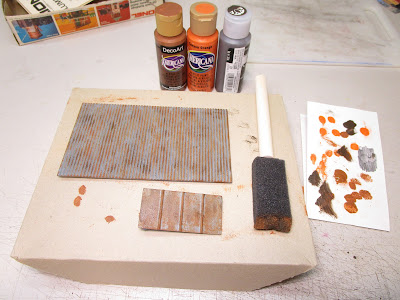
The roof pieces which simulate corrugated sheet metal were painted gray, and then various rust colors were lightly dabbed on with a foam brush. The picture makes it look garish, but in real life it is much more subdued.
Next, the walls were weathered with powders to make them look dirty. I didn't go for the peeling paint look with this structure, but I did want it to look worn. Winters in the northeast can be brutal, but this wasn't supposed to look abandoned or neglected.
To detail this structure, I took a bunch of scrap stripwood and other assorted things and built up piles on thin plywood. This building presumably isn't used to the best wood so off-cuts and scraps were appropriate.
To light this diminutive building I went with a 12-volt "warm white" SMD LED. I superglued it to the underside of the roof and then ran the wires to one edge where they will drop down below. I used a piece of styrene tubing to make a conduit for the wires so that if I accidently tugged them they wouldn't rip off the LED.
After that, I drilled a hole in the base and attached a piece of brass tubing vertically along the inside of the wall to hide the wires. It isn't visible from normal viewing angles.
There are more details to add, but they will wait until the structure is installed on the layout.
Not bad for a $5 kit!


No comments:
Post a Comment