Everything came nicely bundled and wrapped to save space and prevent movement, as the wood is easily broken if the shipping company were to drop it. In fact, this is one reason why Model Railroad Benchwork doesn't regularly offer 6' long boards anymore. I spotted the legs (they have a portion milled away at the top, and then four boards with double green marks on the ends that had to be the leg cross braces. That meant the remaining boards were the module's cross braces.
The kit comes with all the hardware which includes special screws designed for Kreg pocket hole assembly. The instructions caution not to substitute regular drywall screws. It even came with a #2 square head long driving bit for my cordless screw driver, which was handy as I don't have any square head Robertson screw drivers.
I followed the directions and glued one cross brace to each leg, and the mounting locations were conveniently drawn in already. Everything is made from nominally 3/4" thick plywood, and it looks like there are 13 plies/layers used. You can't get that stuff at Home Depot. They align vertically on the legs and four screws inserted into the pockets held the cross brace on, though I used some wood glue for extra measure. The only downside is that the glue caused the parts to slide a little bit so I had to be careful to keep them properly aligned and slowly secure the screws. After an hour, I glued the other leg on. While it is possible that the legs are slightly out of parallel with each other right now, once they are attached to the actual tabletop they will be fine.
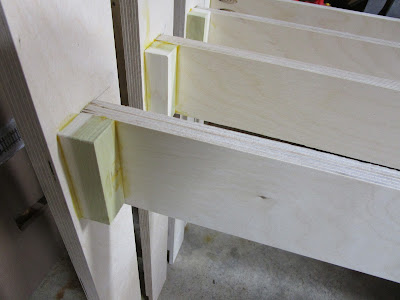
While moving them around the joints started to scare me a bit. There isn't much holding the assemblies together and a good bump from my leg could possibly crack the joint, plus they will be on casters so the legs will be jiggling around. For protection, I added some reinforcing pieces cut from 1" square wood dowel stock. No screws were used, just wood glue and clamps.
To secure the casters to the bottoms of the plywood legs, I cut pieces of quality 2x4 lumber into blocks. Using a paper template, I marked the caster mounting holes and transfered the locations to the blocks. The holes were then predrilled.
I glued on the blocks to the legs with wood glue and secured the joint with a large clamp. No screws or other mechanical devices were used to attach the blocks, and since I only have one large clamp the process too a while to do all eight leg. But, this will give me much more support to attach 2" rubber casters that I purchased at the store.
I took the legs outside and sanded them to remove any rough edges. This was important because unlike regular 1x4 wood, the plywood splinters easily along the sharp edges that resulting from being ripped with the table saw.
Then, I painted everything with black paint. I have never painted benchwork but it is an old theater trick to make them disappear more. I more am hoping it will make the layout appear to be "floating" above the floor. I went to the paint store and was shocked to discover that there are dozens of shades of red and green, probably a hundred variations of white, and only two black colors. I picked "Tricorn Black" (HGSW6258) and got it in satin finish because I didn't want a dull, flat color. A little shine will be nice. I used a roller to obtain a nice stippled finish on the plywood.
The last step was to screw on the casters. Ironically, at this time I discovered the mounting plates did not have all of the screw holes punched out in the same place. It wasn't a big deal to correct though by drilling new holes in the legs.
The next step is assembling the table modules themselves.


No comments:
Post a Comment