This blog will be a record of my personal journey in researching, building, operating, and finally sharing my freelance O scale, three rail layout based on the railroads of New England.
Friday, July 18, 2025
Rolling Hills
Friday, July 11, 2025
Processing real dirt
As scenery progressed I ran out of dirt and needed a lot more. I use real dirt that I dig it up and process at home. The process is described here, and must be done outdoors so nice weather is required.
So, in March I dug some up from my "secret place" and baked it in the oven at 350 for an hour. Some people skip this step but I can't understand why. I certainly wouldn't want living organisms growing on my layout. I used cheap disposable aluminum pans from the dollar store for this. Dirt is heavy, so set them on a cookie sheet for support.
Because of the uncooperative weather we had, the dirt sat for nearly four months until a nice weekend came along in late June when I could use three different sized sieves to filter it. You need to scrape the blobs of dirt against the screen to grind them into a powder, while tossing the actual rocks out. This part absolutely needs to be done outdoors as it makes a mess and dirt blows everywhere, and the fine dirt dust creates a haze that fills the air. Don't do it when it is windy either.
My sieves are small but adequate for the job. I would love to find appropriately sized mesh screen and build some frames out of wood to increase the amount I can process at once, but I haven't found a place that sells small quantities of wire mesh. Something like this, with much finer mesh, would be great.
The result is superfine dirt, and then essentially three sizes of rocks (which might include of balls of dirt that didn't break up during the sifting process). I store it all in cheap containers from the dollar store.
I don't use the rocks much, but I use a lot of the dirt as that is the base layer of my scenery. And now that my supply has been refilled, I can work on some more scenery projects.
Friday, July 4, 2025
Happy Fourth of July
As our nation celebrates another Fourth of July, I thought I would continue the tradition (started on my other blog) of posting an image from my collection of a bicentennial engine.
Bangor & Aroostook GP7 #1776 (built as #573) is seen here on September 01, 1975. For those like myself who love Revolutionary War history, here is a fun nugget: the engine was named the "Jeremiah O'Brien," a Patriot born in Kittery, Maine in 1744 who later became a captain in the Massachusetts State Navy. He was in command of the sloop "Unity" when he captured the British armed schooner HMS "Margaretta" in the Battle of Machias, the first naval engagement of the Revolutionary War.
Friday, June 27, 2025
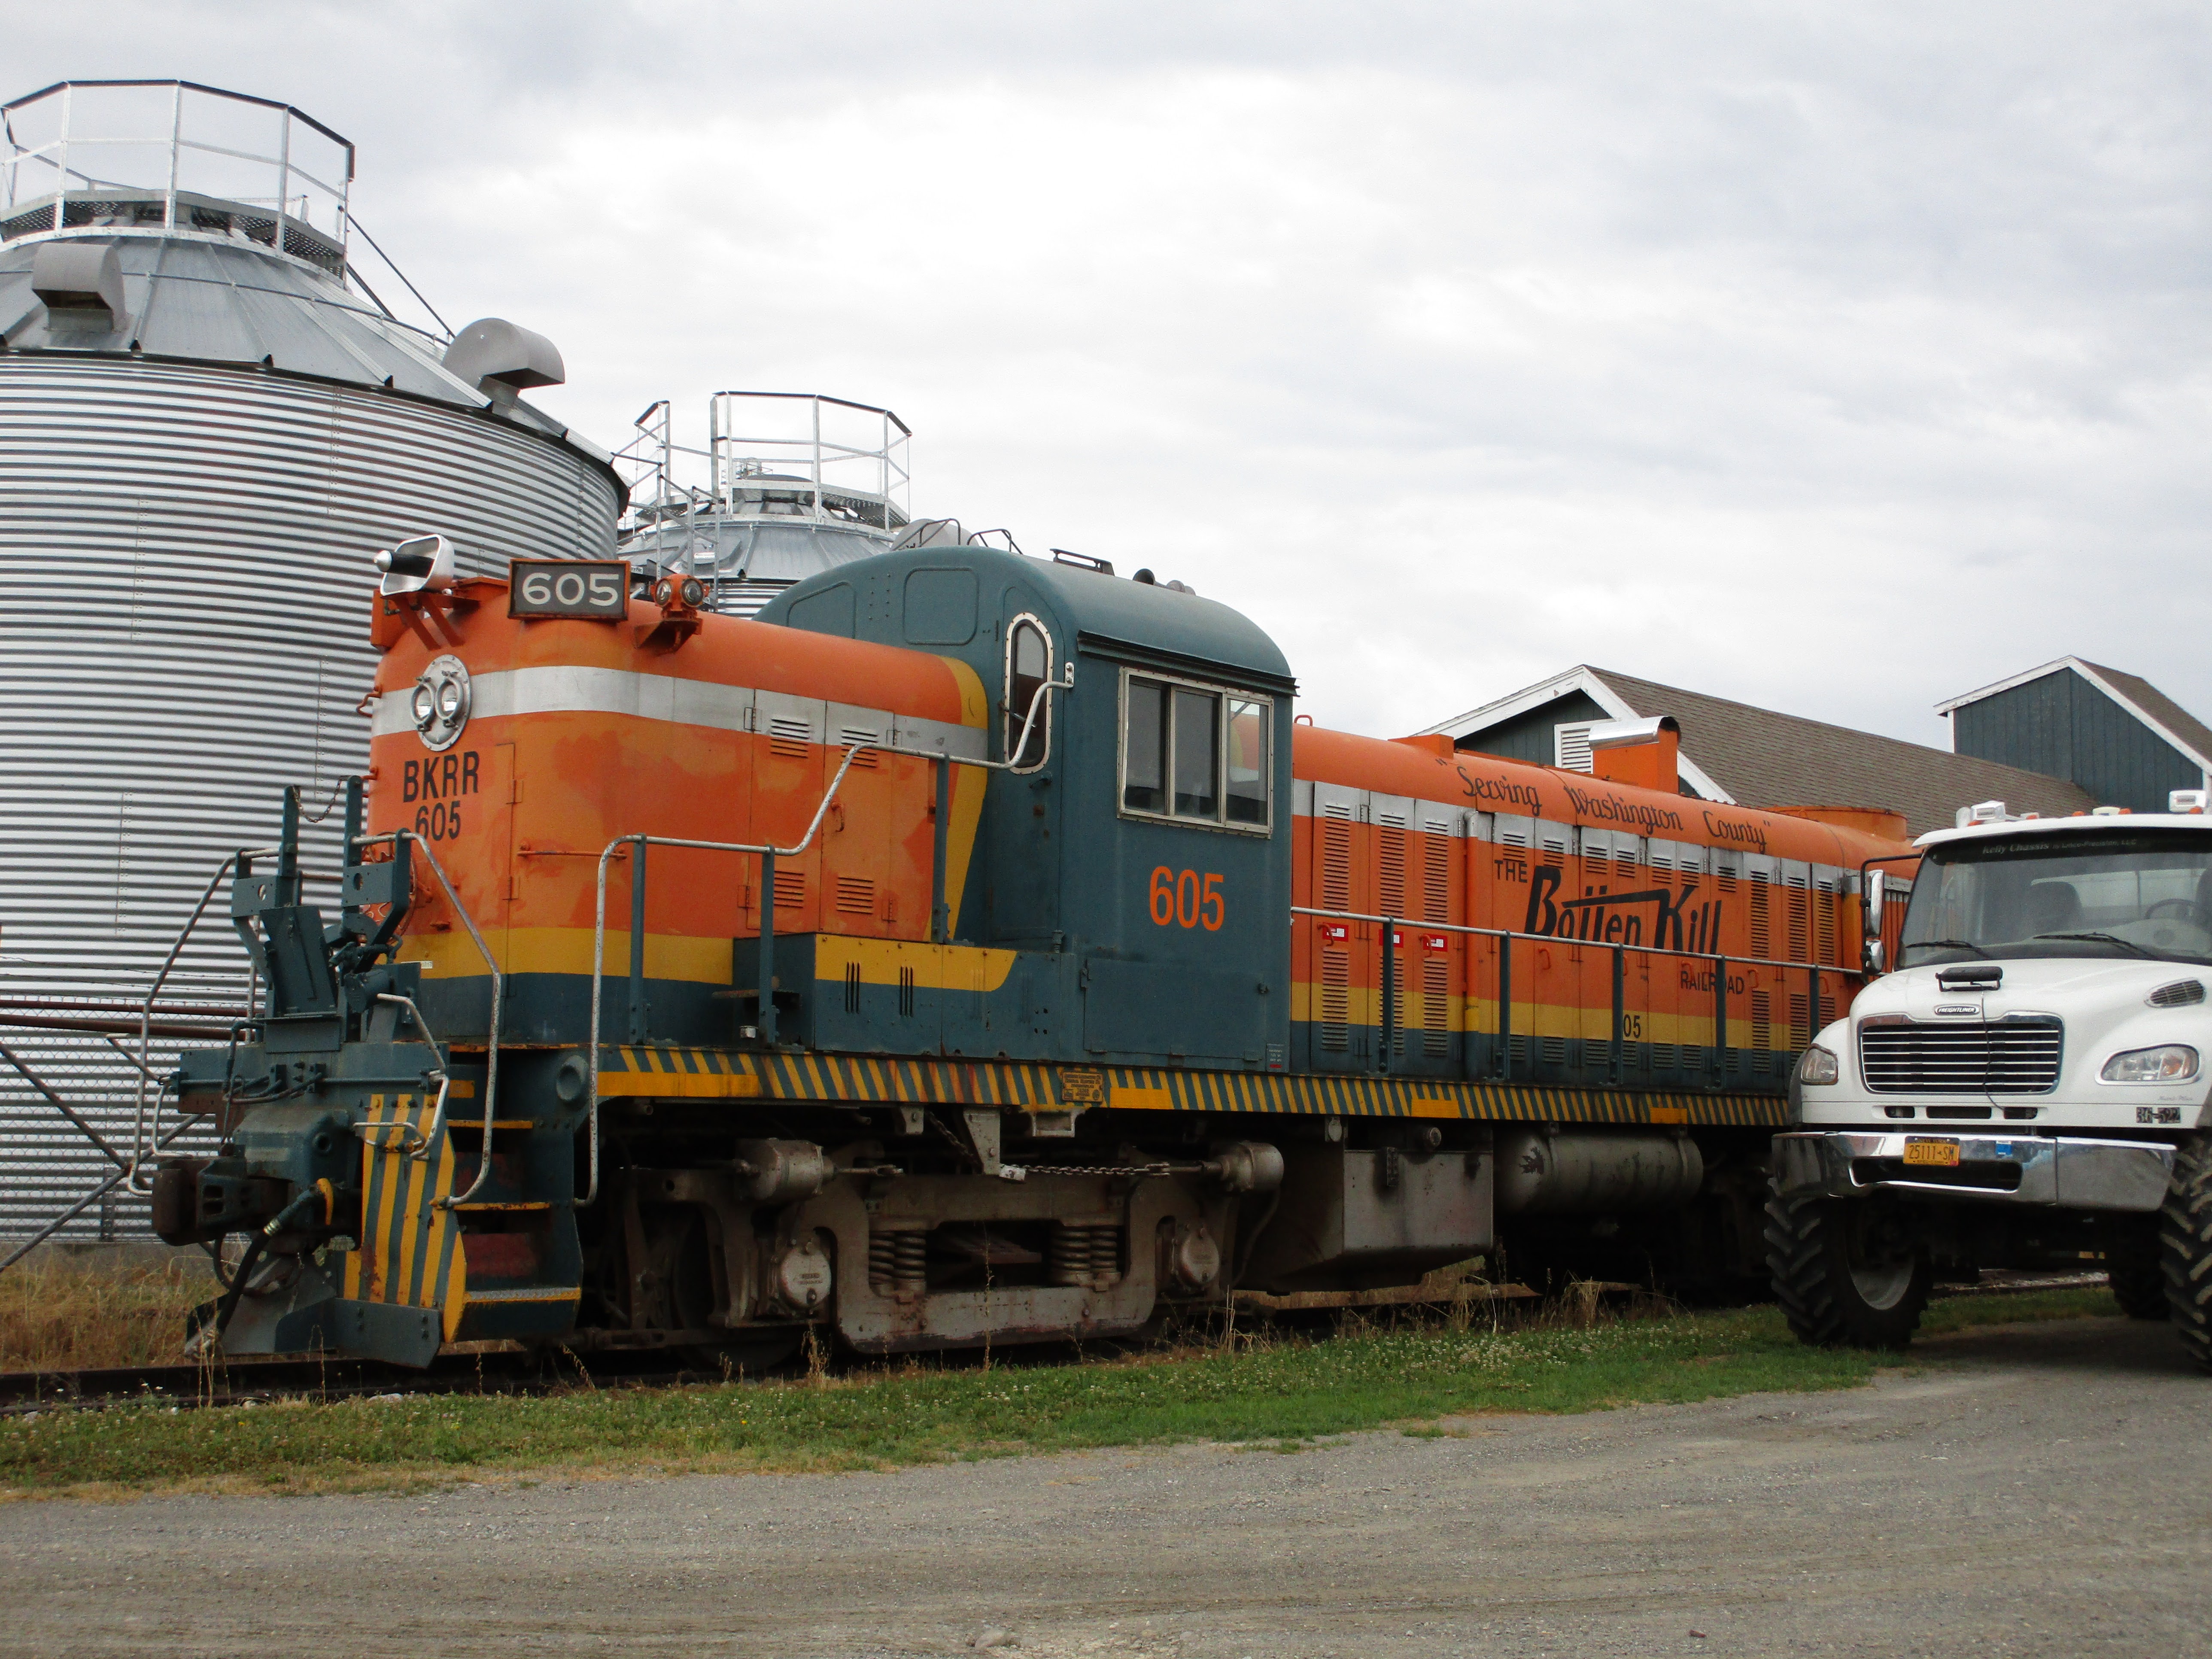
Batten Kill Railroad RS3 #605
After spending a day in 2012 chasing the Batten Kill Railroad I knew there was something special about it. It is the only "local" shortline near me and its colorful Alco roster and picturesque setting reminded me of my favorite local railroad near where I grew up.
During the start of the pandemic in June 2020 I visited the BKRR again. While there, I saw engine #605 which has been out-of-service for a while with a damaged turbo generator. I have never seen it in operation, which is a shame, but I was still able to take some pictures.
Note that part of the front pilot is missing. I don't know if this was sacrificed to keep their other Alco RS3 #4116 going or not, but it looked sad. However, the rest of the paint scheme has held up remarkably well for almost 40 years.
I decided I wanted needed a model of this engine.
Everything about it was neat, from the classification lamps to the corner number boards, and the four-color scheme with silver stripes and trim was really sharp. So, I filed it away in my future "to do" pile.
In the summer of 2021 I had joined the local TTOS chapter. I didn't have a layout, but wanted to start collecting "scale" (1:48) trains which run on three-rail track. And having worked with a local custom painter before on an HO scale RS11 project, I knew this could be my chance to have a model of #605.
During my research I came across references to the "Batten Kill Limited" and "Batten Kill Rambler" passenger excursion trains run by the BKRR. The image below is from a postcard dated May 1984 showing a very clean engine pulling two matching coaches. I wanted my engine to match the appearance in the picture, and it also inspired me to try and model the entire train (to be continued...).
Engine #605 was built by Alco in Schenectady in November 1950 and assigned works number #78369. It was purchased by the Lehigh and Hudson River Railroad as their #10, and later sold in 1972 to the St. James and Lamoille County Railroad as their #203. In 1976, it was sold to the Vermont Railway and renumbered #605, and finally in 1984 it was acquired by the BKRR who kept the engine number. Below is a shot from December 1984..
I then looked at various O gauge Alco RS3 models. Those made by Lionel and MTH either aren't scale (true 1:48 proportion) or had molded on grab irons and other details that didn't look very good. I didn't want to get super involved with the project by shaving off and replacing things. So, I went with a Williams by Bachmann engine, which used old K-line tooling. IT had separately applied wire grab irons and other free-standing details which looked great. Only a few items would need modification. I picked up a new engine decorated for the Seaboard System (they didn't sell undecorated models) from Trainworld for a nice price.
While this was happening I researched decals. I didn't want to deal with custom decals, and if I couldn't find a set commercially available I would give up on the project. I contacted Highball Graphics and discovered their LO-236 set is perfect for BKRR #605. It was promptly ordered.
Changes to the locomotive model that I considered "mandatory" included adding classification lights and number boards at the corners, relocating the three-trumpet horn* to its proper location, and blanking off some of the middle cab windows above the hoods. The classification lamps came from Precision Scale Company (#4248), as did the clear jewels that went inside them (#48329). They also provided the three-chime Alco air horn (#56191). I didn't bother filling in the cab windows with styrene and putty but instead just asked the painter to spray right over them. That resulted in them looking like they had been blanked out with steel plate.
*A note about the horn: a lot of pictures online show various locations and types of horns on #605 over the years, including a single-trumpet horn mounted on the side of the short hood; the multi-chime horn mounted in front of the cab on the long hood (and later on the top of the cab); and Hancock 4700 air horns mounted on both ends of the hoods. Look at the pictures above of #605 from 2020 and you will see the gray air horns at the very ends. They sound like steam engine whistles, and I don't know why the BKRR added them Since they weren't mounted on the engine in May of 1984, I didn't need to add them.
My painter works out of Milepost Hobbies, a great train store in upstate New York. This was not his first BKRR engine, and he knew exactly what he was doing. Still, I thought it helpful to write down everything I wanted and include pictures and directions to avoid misunderstandings. He scratchbuilt the corner number boards for me and he also replaced the single-beam headlight castings on the ends of the hoods with horizontal dual-beam castings. I didn't even know he was going to do that, but they look awesome.
The painting is exquisite and the colors really pop. This could be considered a gaudy paint scheme, but I love it. Those yellow diagonal stripes along the walkways really take it to the next level. And, because I am modeling the engine as it was freshly painted in 1984, I didn't even need to weather it! (Though if you look at the pictures taken in 2022 above, it really hasn't weathered too much over the years).
Ironically, I had just received my engine back from the painter when in April 2023 the E-Z Catch Train Shop announced a special custom run of this engine by MTH. I think mine looks better, though I would have ordered the MTH one had it been announced a year or so earlier.
The engine was the easy part. The coaches stumped me for over two years though I finally figured out a way to model them, But that part of the story will have to wait.
Friday, June 20, 2025
Simple block control
Friday, June 13, 2025
Weathering Maine Central and Conrail cabooses
Friday, June 6, 2025
Weathering O scale freight cars
When I modeled in HO I weathered almost all of my trains. When done carefully and consciously it makes them look more realistic, and I am not really concerned about their resale value. For my O scale (1:48) trains, I also have been weathering them. It is a bit unnerving to make them "uncollectible" but since I am generally paying only about $30-$50 a car I can live with the risk.
However, I don't weather my tinplate trains or trains that are clearly "toy" proportioned because that would look out of place and ruin their cute, toyish appearance.
I frequently buy my O gauge cars used, so the first step is to look them over and repair broken or missing parts. Sometimes replacement parts are available, and sometimes I have to fabricate them myself. I then partially disassemble them and check for loose parts. Boxcar doors are secured shut (unless I am modeling an open-door car), detail parts like brake wheels that were left unpainted by the manufacturer are painted to match the body, and the car's weight is checked. Everything is given a wash in preparation for weathering.
The wheel faces are brush painted various shades of brown, and the backs and axles are painted flat black to hide their shine and reduce their bulk. Truck sideframe are painted flat black and then highlighted with drybrushed orange rust and brown dirt. The couplers are carefully drybrushed brown so as to not gum them up. The car underframes are sprayed flat black followed by various short bursts of brown and rusty orange.
The car bodies are given a flat finish and then weathered with oil paint washes and drybrushing to match prototype pictures. Finally, everything is reassembled.
It all takes time, but I enjoy the process. And, after having put 3-5 extra hours into a railcar I can justify its price tag.
I don't have a lot of cars right now, but they are already taking up a lot of space. Each car is 8x the size of its HO equivalent, and that adds up. So, I am slowly adding to my collection one or two cars at a time. I started collecting several years before I started on my layout to spread out the cost.
On a related note, the O Gauge Magazine's online forum sometimes features pictures by a guy named Steve who goes by the handle "SIRT." In his signature block is a link to his photo albums containing hundreds of pictures of weathered three rail, O gauge cars. They are inspirational for someone weathering in any scale, but more than that they show that you can make really credible looking models from three-rail trains.